Welcome to my Studio!

Where the coffee is always on and I love to share
tips, techniques and ideas.


Would love to have you join me.
Please sign up in the "Followers"
box in the right hand column.


Monday, March 30, 2009

"Kiss this, furball..."

Some excitement..... watching TV the other night... AmberJo was in her condo, sound asleep, lower level, in the back window. Shade was pulled so there was just enough room for her to look out into the dark. All of a sudden there was this LOUD BOOM. Sounded like a sonic boom, or like something huge hit the 5th Wheel. Amber goes nuts and takes a flyin' leap off the condo and onto the counter..lookin' out that window, makin' crazy noises. Rog runs outside... there under the truck is an enormous cat, just walkin' along, looks like our old Muffycat. Well this feral cat had seen Amber sleeping in the window and launched itself right into the glass! There were claw scratches on the fiberglass and paw marks on the window. See photo above for Amber's thoughts on the situation...

More Zentangles! :-D


Top - "Phantom Olive"
Center - "Sea Creature"
Bottom - "Stairway to Nowhere"

Sunday, March 29, 2009

Zentangles


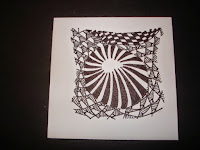
Came across this fascinating artform on someone's blog on an AB site I belong to. Gave it a try. This is an "Ensemble" of 9 squares, each 3 1/2 inches. They are "doodled" individually and then put back together as a whole piece of art. Sort of like a quilt. The key to the picture is the pencil "string" that runs through it that gives continuity. To make a 3 1/2 x 3 1/2 in. tangle, cut a piece of white cardstock to those dimensions. Then take a pencil and draw a random curvey line on it. Now take an Ultra Fine Point Sharpie and fill in the spaces made by this pencil line, with doodles. - The "Emsemble" would be a great group project.
For more interesting info on zentangles go to http://www.zentangle.com/. And no, I didn't purchase the $49.00 kit!

Tea and Jam Tag


This tag was created as an example for the March/April challenge on Stampin' on a Budget. http://groups.yahoo.com/group/Stampin-on-a-Budget/
Challenge was to create a tag or card using a product label and supplies we already had. I cut apart 2 labels from 2 jars of Strawberry Preserves (Parade and Hillside Brands) and used them as a background for the embossed and watercolored teapot.

Tuesday, March 24, 2009

Two hours worth...


of beachcombing this morning! The most sea hearts I ever found at once :-D --- Went out with the metal detector early, found a few coins, but decided to go back out after seeing all the "stuff" that had washed up after last nights wind. Came back with all this! See penny at lower left to get an idea of the sizes.
Just above the penny are 2 sea burgers. The round pods along the top are sea coconuts. Even found a lotus pod, far right center.
A good day treasure hunting!

Two if by sea...

We took the Ferry again yesterday to Aransas Pass to get supplies and I snapped a few pics. It was windy, but you could hardly tell, the boats are so heavy. They just got done refurbishing them. I think they have 6. Didnt have to wait to cross, but coming back there was about a 5 minute wait. There were beautiful black cormorants sitting atop the landing gates. And pelicans on the pilings. The fan-tail grackles were doing their antics, walking around the edge of our truckbed and perched on some guy's mirror looking in. I like going to the Pass...it's so hectic going into Corpus, not to mention twice the distance.
It reminds me a lot of Berlin up home, small town. Everything's there you might need, but not the traffic. Getting around is real easy. Did the usual HEB and WalMart things and stopped at a great little Mexican restaurant for lunch. When you see the Firemen and EMT's eating there, you know it's good! And reasonable. $4.99 and we couldn't finish it all. Back to the old diet today :-P

Just a note...added YouTube and Recipe Search gadgets over on the right. Type in any recipe or catagory (for YouTube) and the info will come up. Real handy!


Monday, March 23, 2009

Pelicans


Saw the coolest thing the other day...flocks of pelicans, hundreds.

Soaring low along the beach and swooping down into the waves. They fly with a leader, in a V like geese, but they're sooo quiet, not a sound. All you could hear was their wings cutting the wind. They were huge. What a site. Only caught 4 here, and I didnt have the zoom on. arrrgh!

Oh,....
have added a link to some original poetry along the sidebar if anyone's interested.

Sunday, March 22, 2009

Shell Embellishments


The "Dream" layer was done with a plastic stencil and the Cuttlebug, then stamping and embossing "Dream" in gold.The butterflies are coquina shells that I sewed on and then applied a dab of tacky glue in the center. Other supplies include a torn piece of handmade paper.

ATC

The Irish Atc (Artist Trading Card) was done as part of a challenge on my Stampin-on-a-Budget site. Challenge was to use the inside of a security envelope somewhere on the project. Used it here as part of the background. Other items used: handmade paper, metallic rub-ons, punches, stamping, embossing, hand made music embellishment.

Pit Beads

"Art in My Garbage" is a favorite theme I deamed up.All that "stuff" in the trash-bin surely has another life as an "art supply" - Yesterday the discovery was date pits ;-DThey scrub up well, have a nice rustic, "woody" look and make great beads when drilled with a fine dremel bit. Have also just discovered "sea beans", along with the lovely shells on the Texas beaches. The teeniest bit of baby oil shines them up nice. Avocados, apple seeds, prune pits, etc. can all be used as well. http://www.beachbeans.com/bean_descriptions.html

Faux Brads


Brads give extra pop to a card. Can't afford to buy all those metallics and colors?
Take your 1/8 or 1/16 inch circle punch and punch them out of aluminum cans, yogurt container sealers, flaps from fancy gold Christmas card envies or colored cardstock. Then just
glue them to the corners of your card.
Want a fancy brad? Take a 3/16 flower punch, punch out flower, indent the center on a mousepad with a dry ballpoint pen or an embossing tool. Then punch the corners of the card layer you want to put the "brads" on with a 1/8 inch punch. Attach this layer to you base card. Put a teeny bit of tacky glue in the holes and on the back of the flower "brad". Insert in hole. The holes with the glue help to keep these 2 dimensional brads in place. (A tweezer helps a lot in glueing and placing them) See "Iris" photo on right.

Friday, March 20, 2009

Spring Break in Port A


Spring break hasn't affected us much here...outside of a little more traffic noise.
The beach gets crowded late morning and afternoon, but that's not when I go down there
anyway. Of course there were a few "incidents" on the news. The only thing I notice was the beachcombing is not as good for some reason, it may be the tide schedule, don't know. But haven't picked up much lately. Am going to make some cards using coquina shells later today. Will post. Oh...friend Debbe sent us a real cute musical St. Pat's Day card...AmberJo hates it. It started playing and she attached herself to my leg! Whenever I open it, she's in attack mode, even from a sound sleep. It plays bagpipe music. roflmbo!

Thursday, March 19, 2009

Thursday, March 19


Loon & Crane Return in central Wisconsin is always a wondrous
event . Their calls and chatters bring the spring. This page is another done for the Traveling Wildlife Art Journal. Stamped, collaged and embellished.
Also, today was Dad's birthday.
The artistic ability is from him... and a Greater Power.
Here's to you Dad, Love always.

Wednesday, March 18, 2009

An "AHA" moment


After months of procrastinating, and searching for a good price, I finally purchased
a Cuttlebug die cut machine.
It's everything it's cracked up to be! So been playing around a bit.
Searched for "sandwich" recipes and been experimenting with those too.
They say every machine is a little different and not to force anything through that's too tight.
Brass stencils are supposed to work in it also. And here's where the "Aha!" comes in.
Thought, what about the thicker plastic stencils??? Here's the sandwich I came up with
that produced results even better than the brass stencils. Will get a picture in as soon as I can get it in the puter.

Plate A
Plate B
A piece of cardstock (used as spacer)
A piece of fun foam
Red rubber plumber's gasket
Cardstock that will be embossed
Stencil
Plate B

Pit Beads

"Art in My Garbage" is a favorite theme I deamed up.
All that "stuff" in the trash-bin surely has another life as an "art supply" - Yesterday the discovery was date pits ;-D
They scrub up well, have a nice rustic, "woody" look and make great beads when drilled with a fine dremel bit. Have also just discovered "sea beans", along with the lovely shells on the Texas beaches. The teeniest bit of baby oil shines them up nice. Avocados, apple seeds, prune pits, etc. can all be used as well. http://www.beachbeans.com/bean_descriptions.html